Monday, October 31, 2011

candy dish

I have been inspired by all the things other people have made out of dollar or thrift store candlesticks and jars, so of course I had to copy them and make one of my own! My thrift store didn't have any good jars when I went though, so I bought a bowl instead and made a candy dish!

The bowl and candlestick were $1 each at DI (which by the way is comparable to Walmart on a Saturday. I almost suffocated) and the wood base was $1.27 with a 20% coupon at Jo Ann. The E-6000 was $3.99 with the coupon, but I only used a little bit and have tons left over for other projects. The spray paint I already had.

So first I glued the candlestick to the base. And almost died from inhaling the E-6000. That stuff is brutal. The rest of this little project was completed outside.

I forgot to take a picture, but I spray painted the bottom part before I glued the bowl on.
When I got to this point I decided it needed something to fill in some of the space on the wood base, so I added some beads.
Easy!

I love the simplicity of something like this. So far I have had different kinds of candy in it, but after the holidays I might fill it with something other than candy. Something like this would also be a cute gift idea. The possibilities are endless!

Linked to

Thursday, October 27, 2011

runner for tv console

Earlier this year I went to China, and while we were in Shanghai we took a day trip out to a town called Suzhou (soo-joe) where 70% of the world's silk is made. We toured a silk factory where we saw how silk is taken from silk worms and made into fabric. It's gross. Mostly because they don't get rid of the worms after they take their silk. They boil them and then sell them to restaurants. See? Gross. 

I bought 3 different styles of silk fabric and until now had only used one of them to make a skirt. The other 2 have been waiting for just the right project.

I wanted a runner for the TV console I showed you here, and I decided to use this fabric to make it.
Isn't it pretty? LOVE

I bought some inexpensive black fabric for the back and tassles for the ends,

 cut the fabric to the size I wanted, and pinned it together. The silk was a perfect 78 inches long so I was able to do the top without any seams, but I did have to piece together the bottom fabric. No big deal since the seam wouldn't show anyway.

As I was sewing the 2 sides together, I stuck the tassle between the right sides with the cord sticking out so all I had to do was sew over it to attach it.

I love how it turned out. It adds so much to the TV console and it's a great backdrop to anything I put on it. Plus, it has some sentimental value for me!


Linked to

Monday, October 24, 2011

dresser turned tv console

This used to be my living room wall. It was brown, plain, and boring. I had very little space to decorate, and what space there was seemed too small to really do much. So brown, plain, and boring it remained. For 4 years. I could never figure out how to make it look better with these 2 mismatched little things (the tv stand was the first piece of furniture I bought after college and the thing on the right opens and was my DVD and CD storage). And I didn't know what to do on the wall because it seemed like if I hung anything there it would be too high. Things hung too high on the wall is a big pet peeve of mine. A change was definitely needed.

So I got online to see if I could find an inexpensive piece of furniture to refinish, and this is my $20 find 

Perfect.

And by perfect I mean old, beat up, and ugly

with hideous brass hardware

But can you see the potential?

Look how much better it looks just with the handles taken off!
Who wants a bag of ugly brass handles? Yeah...didn't think so.

I sanded...

filled in 32 holes and started to prime...

and then switched from spray primer to regular paint. My trigger finger still reminds me how much we did not enjoy spray painting.
I mixed the color myself so I can't tell you what it's called. I bought this can of white paint and primer in one, and since I had a bunch of the wall color (Glidden Chatham Tan ~ the one my finger is on) left over from when I painted the living room and kitchen, I just mixed some in with the white to make an off-white kind of color. I actually did this a few months ago when I refinished my kitchen cabinets (I'll show you that before and after later) and I had enough left over to use it for this too. I LOVE the color, and the bonus of mixing my own paint is I didn't have to worry about coordinating it with the wall color.

After adding some new handles, here she is in all her refinished glory.  
Doesn't this wall look so much better now? I'm loving the transformation.
Let's see the before again
and another after
Love it.

This was all I was planning to do, but now I'm not sure I'm done. There is a lot of space in the bottom/middle area. Stencil maybe? I picture something like one of these:


(I stole all of these pictures from Better After, a fabulously hilarious blog that will make you want to go right out and find something in the dumpster or on the side of the road to refinish)

Except none of these really. I can't find anything that's exactly what I have in mind. Something not too bold but not too subtle to fill in that space. In my mind I see something swirly or damask in grey. What do you think?

Linked to

Friday, October 21, 2011

fall mantel

I had one other little thing I wanted to show you before I revealed my full mantel, but I decided it wasn't worth a whole separate post because it was so simple. So I'm going to show it to you now along with the full mantel. Be very excited :)

First ~ a leaf garland made out of felt. Inspiration for this cute project came from Elsie who blogged about her garland here

All I did was cut some leaf shapes
out of felt in these different fall colors

and string them together using brown yarn
and a needle with a big eye
Simple. And so, so cute.

Now the mantel! 
My mantel is tiny. It's about 7 inches deep and only 42 inches wide, so there's not a whole lot I can do with it. But I'm just happy to have one. So with that limited space, here is what I came up with:
I LOVE all the orange

The orange plaque on the right is hard to see in the picture above, so here is a close-up so you can see what it says. I made it a few years ago at a Super Saturday activity.

The big candlesticks are from Home Goods, and the orange candles are from the dollar store. When I moved in the strip along the middle of the mantel was brass, so I just spray painted it black. Such a big difference for something so simple. I'm loving how everything came together!

For a recap on how I made the leaf wreath and FALL letters, check these links:

Linked to

Wednesday, October 19, 2011

FALL

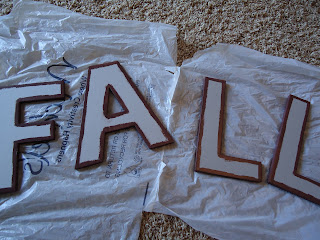
When I was thinking about how I wanted my fall mantle to look, I wanted something that said fall or autumn but I didn't want one of those wood cutouts you see all the time. This is what I came up with instead.
Everything pictured is from Hobby Lobby except for the brown paint which I've had for awhile but I think I got it at Michaels. The letters were $2 each, so with everything together it ended up being less than $10!

First I painted the edges of the letters with the brown paint
Then just traced the letters on the paper, cut it out, and Mod Podged it on!
This was a simple, inexpensive, and fun little craft and it turned out really cute. I have one more thing I want to show you before I reveal my full mantle, so check back soon! I know you're on the edge of your seat :)

Linked to

Monday, October 17, 2011

leaf wreath

Inspiration for this little project came from Thrifty Decor Chick, who I love. Seriously, take a few minutes ~ or hours ~ to explore her blog and you'll be hooked too. She made this wreath and I just love it.

So I decided to make one of my own. All I needed was some cardboard (I used the box from a case of chicken broth I bought at a case lot sale), some fake leaves I have used in various ways the last couple of years, and a glue gun. 
First I cut the box into a square. Mine is 14" with an 8" opening so the cardboard is 3" on each side.
(plus you get a shot of my toilet paper. Sometimes it pays to look around and see what's in the background of a picture you're taking...)

Then I just started gluing


This is how it turned out and I love it!

I wanted to hang it above my mantle on this wrought iron thing, so I just glued a bent paper clip to the back and hooked in on.
This wreath was easy and fun to make while I was watching TV one night, and the best part is it was free! I already had everything I needed. Gotta love that :)

Check back soon for pictures of the full mantle!

Linked to

Friday, October 14, 2011

Halloween plate

I love to decorate for fall, but I have never been a big Halloween fan so I don't have much in the way of decorations for that little non-holiday. I decided to add a little something this year and this is what I came up with.

All I had to buy was the piece of paper. I already had everything else! The only thing not pictured is black spray paint which I already had too.

First I spray painted the back side of the plate black

then Mod Podged the paper onto the front
I didn't take pictures of this part, but after it was dry I just flipped the plate over and used an exacto knife to cut the extra paper off. I also put a layer of Mod Podge on the back to seal the black paint so it wouldn't get chipped or scraped.

Then I just stuck the vinyl numbers on! I already had them from another project I will show you later. You can see in this picture why I painted the back of the plate. I cut the paper slightly smaller than the plate so the edges would be glued down all the way, so I wanted the black to show through instead of just the clear plate.

Fast, easy, fun, and inexpensive! What more can you ask for?

Happy Halloween!

Linked to

Tuesday, October 11, 2011

ruffle bag

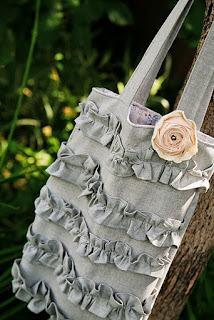
I saw this bag on Pinterest
and I knew I needed one like it. It was made by Bobbi Jo and you can find the tutorial on her blog here. Her tutorial is really good and easy to follow, so I won't repeat all the steps here. I did add a pocket for my phone and keys though, so I will show you how I did that.

I wanted a bag for fall and winter, so I chose corduroy for the outside and a cute paisley for the liner

For the extra pocket I added, I cut out 2 pieces of the liner fabric that were 10" by 5" and sewed them together leaving a space to turn it right side out.

After turning it right side out, I ironed it flat

and sewed it onto one side of the liner fabric (the 2 liner pieces have not been sewn together yet at this point) with one line down the middle.

Then I folded each side in about a 1/4 inch to meet the seam I had just sewn. This makes the pockets stick out a little bit instead of being flat against the side of the bag. To finish I just sewed down each side and across the bottom. The space I had left open to turn the pocket right side out was the bottom right corner in this picture, so it got sewn shut when I attached the whole thing to the liner.

This is how the inside looked when it was all done

Done!
I love how it turned out and it was really a very easy project, even for someone who pulled her sewing machine out of the closet for the first time in years to make it.

Linked to