Showing posts with label sewing. Show all posts

Monday, February 13, 2012

fleece camera cover

I've mentioned before that I love to travel, and I have another trip coming up in just under 3 weeks! I'm going to Ireland and I'm so excited! I've heard it's absolutely beautiful. We will have a car and the freedom to go wherever we want for the week we're there, and we will be staying in 4 different castles instead of regular hotels. It's going to be so amazing. With this trip coming up so soon, I have been working on some different travel-related things and today I'm going to share one of them with you.

This picture was taken in Prague a couple of years ago and it shows how I used to carry my stuff on trips. My camera around my neck, and a big bag for everything I might need while we're out sight-seeing (snacks, water, guide books, maps, money, etc...it would get pretty heavy). It worked, but it wasn't the most comfortable and I always felt like I had to hold onto the straps of my bag.

On that trip to Prague I bought the messenger bag you can see in the pictures below. It has a long strap so I can carry it diagonally across my body which is much more comfortable, convenient, and safe. It has lots of pockets and sections, so I'm able to carry everything I need in a much smaller bag. It's perfect.

When I bought that bag I started carrying my camera in one of the zippered parts instead of hanging around my neck. It was safe there but also easy to get to whenever I wanted to take a picture. With that change I no longer needed the case I used before, but I still wanted to protect my camera so I continued to keep it in the case anyway. Between Prague and China (the 2 pictures below) I bought a new camera. It's much thinner than the old one but slightly longer, and because of the size difference I was no longer able to zip the case completely. It still protected my camera from scratches, but it just wasn't working that well for me.


When I saw this camera cover on howjoyful.com I knew it was the perfect solution.

Here's mine 
(this picture was taken with my phone since you can't actually use your camera to take a picture of your camera, so it's not the best but you get the idea)

Mine is a little bit thicker because I used fleece for both the outside and the liner, but I like that it's super soft and will protect my camera screen from scratches. Plus I already had the fleece so this project only cost me $2.59 for the velcro (really only 22 cents because the velcro came with 12 pieces and I only used 1).

Joy's tutorial is good, but I did do a couple of things different:
1. I cut my fabric 1/4 inch longer than she did and I still wish my cover was just a tiny bit bigger (the camera fits inside, but just barely)
2. she ironed interfacing onto the outside fabric, I left that part out
3. she made the outside and the liner the same size, my liner wouldn't fit exactly right inside the outer layer so I made it slightly smaller
4. she used batting between the outside and the liner, mine was too thick with batting so I left it out
5. I finished the opening at the top differently than she did. I used the same method as I did to finish off the top of my ruffle bag. It's kind of hard to explain, but ask me questions in the comments if you want more details and I will try to explain it.

Tuesday, February 7, 2012

rice heating pads

What do you do when it looks like this outside?
It had just started snowing and the snowflakes were HUGE, and after it came down like this all day there were several inches of it on the ground. Sounds like a good day to stay home and craft! And since it was so cold, my mind was on ways to try and stay warm.  

This is not a new idea, but it's something I made for the first time. My Valentine gets cold easily (we're the reverse of most couples when it comes to body temperature, I don't get cold that easily and he likes to keep the heat at 80), so for Valentine's Day I decided to make him some of those rice filled fleece heating pad things. I don't know what they're called, so that's my technical term :)
I wanted to make a few different sizes so they could be used for different purposes, and this is what I ended up with. I think the 2 bigger sizes would work well for taking to bed at night or just for having by your feet watching TV, and the 2 small ones are for coat pockets.


To give you an idea how big they are...


So basically, cut 2 pieces of fleece in whatever size you want and sew them together leaving an opening to turn it right side out. Use that opening to fill them with rice, and then stitch it shut! It's that easy, and I know he's going to love them on Valentine's Day!

Friday, December 16, 2011

1 sweater, 3 crafts ~ glass block snowman

I'm excited to show you what I did with the last part of the sweater, but first a recap of the first 2 projects.

I started out with this sweater

First I made these leg warmers

and then this pillow

That left me with these scraps that don't look like they could be used for anything, right?

I turned those scraps and these supplies...

Into this!!
How cute is this little snowman? I can't look at him without smiling.

The glass blocks have an opening on one side, so the first thing I did was stuff the lights inside both blocks and glue them together using E-6000 with the smaller block upside down so the openings face each other.

You can see in this side view that the fronts and backs of the blocks are what's glued together and there's a space between them where the cord can come out.

Once the glue was dry and I had removed the stickers, I used the bigger stencil brush to blot some white paint all over the front of both blocks. When that was dry I used the bigger brush to make the buttons and the smaller one to make the eyes and mouth. For the carrot nose I just free-handed the shape in pencil and then went over it with orange paint.


For the hat I cut the top part of the sleeves of the sweater off. They were already rounded at the top where they met the shoulder seam, so all I had to do was follow the rounded edge as I sewed them together. I also cut some little strips to make a tassle at the top. I tied them together using a piece of thread and then just stuck it between the two sides of the hat and sewed over it. I used a plastic shopping bag to fill the hat and hot glued it to the glass block to keep it in place.

The scarf is just 2 strips cut right under the neck of the sweater and sewn together, then tied around the snowman's neck. One side of the sweater had more fabric left than the other so on the side with less I had to include part of the sweater's neckline, but I just put that part on the back side of the snowman so it doesn't show. The last thing I did was cut some slits in the ends of the scarf.  
This was such a fun little project and I couldn't be happier with how it turned out! He just might be my favorite winter decoration and I'm so glad I get to keep him out after Christmas!

Linked to

Entered in

Wednesday, December 14, 2011

1 sweater, 3 crafts ~ pillow

On Monday I showed you how I used the sleeves of a sweater to make these leg warmers. You can see that post here if you missed it.
That left me with this.

The next thing I did with the sweater was use most of the body to make this pillow.
I was able to keep the side seams intact and just pinned the sweater around a pillow form and then sewed the top and bottom shut. The sweater was a little bit bigger than the pillow, so in the back I cut it open and sewed it so the two sides overlap. I thought about sewing a button on, but it stays shut without one so I decided not to.

I also sewed some ribbon and a snowflake ornament to the front to make it look a little bit more wintery. Since I finished decorating for Christmas I have been working on a few things that will stay up through January, and I think this pillow is perfect for that.
With the pillow done I was left with this. I know it doesn't look like you could do much with these scraps, but check back Friday to see how I used them to make the cutest of the 3 projects!

Linked to

Monday, December 12, 2011

1 sweater, 3 crafts ~ leg warmers

My mom gave me this sweater because it didn't fit her anymore, but it was big on me...so as any crafter would, I decided to cut it up and use it for some crafts! This week I will show you 3 different things I did with it so be sure to check back!

First and easiest ~ leg warmers! I'm loving the look of leg warmers under boots, so I just cut the sleeves off and hemmed the top. Here they are with a few different pairs of boots:


Cute!

That left me with this
Check back Wednesday to see how I used more of the sweater!

Linked to

Monday, November 14, 2011

some old clothes refashioned

If you like sewing and haven't discovered Tea Rose Home and Keeping It Simple yet, do yourself a favor and click on those little links there and spend some time exploring. These ladies are so creative and constantly inspire me to go "shopping" in my own closet to see if there is anything I can refashion. We all have those clothes we never wear but can't seem to get rid of, and on these blogs you will see so many ideas of things you can do to make them cute again! With budgets being tight, it's a great way to have something "new" without spending any money!

This turtleneck and skirt were 2 of those things for me. I've had them both for years and this was the first time the skirt had been taken out of the closet probably since I moved in over 4 years ago. The turtleneck wasn't much different. I wanted to turn them both into something I would want to wear again so they wouldn't just be taking up space in the closet.
(You will be relieved to know I never actually wore this outfit. Yikes. I just put it on for the before picture.)

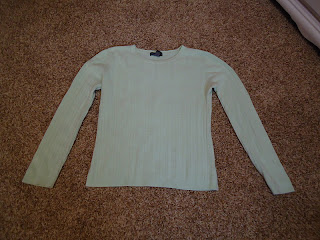
I wanted to turn the turtleneck into a cardigan because they are pretty much my favorite thing right now. To do that all I did was mark the center of the front of the shirt with pins

and then cut it open!
It's made of ribbed fabric so I was able to make a straight cut just by following the lines of the ribbing. The best part is that the fabric doesn't fray at all so I didn't even have to hem anything. Instant cardigan!

I also cut the turtleneck part off and used the fabric to make a cute flower (4 circles folded in half and then in half again with a button in the middle)

For the skirt I pretty much just wanted to make it shorter. I'm just not a floor-length skirt kind of girl. I used another skirt that is the perfect length to measure where I wanted to cut

and then just hemmed the bottom.
It's a big improvement just like that, but I may still use the fabric I cut off the bottom to add something to the skirt. Maybe flowers along the diagonal seam? What do you think?
I used a tutorial on Sweet Verbena to add a cowl neck to that white shirt. I think it turned out cute, but hers is much better. I was just trying to use fabric I already had and I didn't have enough to make it very big.

A "new" outfit for $0!

Sometimes when I'm about to cut something I get a little bit nervous that it won't turn out how I imagine it and the original thing will be ruined, but then I just think I never wore it anyway so if it is ruined it doesn't matter and I might end up with something really cute! What do you have in your closet that could be refashioned?

Linked to

Monday, November 7, 2011

ruffle shirt

I saw this tutorial for making a ruffle shirt and just fell in love with it. I don't have much experience with a sewing machine, but after making this ruffle bag I felt like I could handle a shirt. I can sew a straight line and that's really all this takes. I had two of the cap sleeve layering shirts from Shade in pink and one of them was pretty old and I didn't wear it anymore, so it was perfect for cutting up to make ruffles! This is how my shirt turned out:
I'm loving ruffle shirts under a cardigan right now, and I'm really happy with how this shirt turned out. Sachiko's tutorial is easy to follow and the whole thing only took a couple of hours to do. I also love using t-shirt fabric for ruffles because it doesn't fray so there's no hemming.

Here's Sachiko's shirt
She did 2 flowers and I only did 1, but other than that it's a pretty close match! If you want to a bunch of cute sewing ideas, definitely check out her blog!

Linked to

Thursday, November 3, 2011

pin cushion

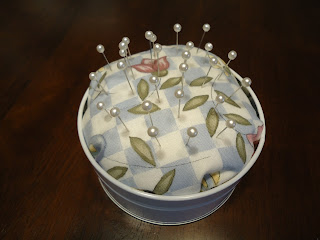
I've been doing a lot of sewing lately and have been wanting a cute pin cusion. I saw this one on Make it and Love it and decided to make my own version! And love it :)
All I had to buy was the tin which was $2 at Michaels. I already had the fabric and batting left over from a quilt I made a few years ago.
I just wrapped the fabric around the batting to make a pouch, put some hot glue on the bottom of the tin, and stuffed the pouch inside. Easy, fast, and look how cute!

And I may or may not have bought new pins to match the fabric :) If it's going to be sitting out next to my sewing machine it might as well match, right?

Linked to

Thursday, October 27, 2011

runner for tv console

Earlier this year I went to China, and while we were in Shanghai we took a day trip out to a town called Suzhou (soo-joe) where 70% of the world's silk is made. We toured a silk factory where we saw how silk is taken from silk worms and made into fabric. It's gross. Mostly because they don't get rid of the worms after they take their silk. They boil them and then sell them to restaurants. See? Gross. 

I bought 3 different styles of silk fabric and until now had only used one of them to make a skirt. The other 2 have been waiting for just the right project.

I wanted a runner for the TV console I showed you here, and I decided to use this fabric to make it.
Isn't it pretty? LOVE

I bought some inexpensive black fabric for the back and tassles for the ends,

 cut the fabric to the size I wanted, and pinned it together. The silk was a perfect 78 inches long so I was able to do the top without any seams, but I did have to piece together the bottom fabric. No big deal since the seam wouldn't show anyway.

As I was sewing the 2 sides together, I stuck the tassle between the right sides with the cord sticking out so all I had to do was sew over it to attach it.

I love how it turned out. It adds so much to the TV console and it's a great backdrop to anything I put on it. Plus, it has some sentimental value for me!


Linked to