Monday, November 28, 2011

Christmas decorations!

I hope everyone had a relaxing and fun Thanksgiving weekend! After stuffing myself with all kinds of deliciousness and then indulging in a little bit of vampires and werewolves, I got started decking the halls! Here is a little tour of some of my favorite Christmas decorations.

I love changing that lantern for the different holidays and seasons, and I'm loving it right now filled with snowflake ornaments. And how cute is that little bowl of snowballs? It's my candy dish filled with styrofoam balls and I think it's just adorable.

This is my simple centerpiece for the kitchen table. I love to walk by and hear the bells jingle :). The snowflake platter has a big bowl that goes with it too. Love love love.

A cute snowman in a little forrest on top of my kitchen cabinets. I love the Dr Suess look of those trees!

My mantel in the daytime without the lights on. I am in love with this mantel. The wreath is 3 feather boas wrapped around a styrofoam form (I got that idea on Pinterest, but the pin doesn't link to a blog). I've been collecting those trees for the past few years and this year I found the one on the far right. I love that they're all basically the same shape but none of them match exactly, and I think I now have the perfect set. That doesn't mean I won't buy more though...

I added some picks to the garland to fill it out a little bit...this one with red berries, and in the back you can see one with pincones on it. I love adding pinecones into my Christmas decor.

Similar, but with frosted berries. Love it.

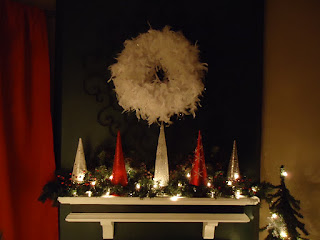
The mantel at night with the lights on. So pretty. You can also see on the left that I replaced my regular purple curtains with red ones for Christmas. Just some $4 sheets with one end folded over and sewn to make a pocket for the curtain rod to go in. No hemming, and I didn't even cut anything! Love easy stuff like that.

A few other things around the house:

This is the front (white side) and back (red side) of a quilt my mom made me. So cute.


and these cute framed snowflakes that you've seen before

Just regular candles with double sided tape and glitter

One set of Christmas dishes (I have 2). Now I just need snowflake silverware...

and a tiered dessert stand

Now for the tree!

These 2 little snowmen are new this year and they just make me smile. So cute.


Santa's round belly

I love ornaments that are different shapes. I have so many round ones and it's fun to add in some funky shapes to mix things up a little bit. These are a few of my favorites:


And snowflakes...of course

But my very most favorite ornaments are the ones I've gotten in other countries during my travels.
Like this one from London (kind of hard to see in the picture, sorry)

this one from Venice ~ frosted glass with snowflake cutouts

a set of 12 of these from Prague

this one's also from Prague

and this one from China

After I get all the ornaments on the tree I like to go back and fill in any spaces with pinecones. They smell good and I love the homey feeling they add.

I don't have any good pictures of the full tree. I just have a point and shoot camera and it takes good pictures, but I don't know what setting to use to get good tree pictures. I messed around with it a little bit last night but could only get pictures that are all lights. But it's basically red, silver, and white with lots of snowflakes! It's really pretty and I love to watch Christmas movies with just the tree and mantel lights on. There's nothing more cozy than that!

I took a little blogging break over Thanksgiving and now that I'm back and I can't wait to see all of your Christmas decorations!

Linked to

Thursday, November 24, 2011

can storage

I hope you're all enjoying Thanksgiving with the people you love today. And for those outside the US ~ happy Thursday! I'm just stopping in for a minute to pass on a fantastic idea I found...

Amy over at Then She Made had the most brilliant idea. When I saw it on Pinterest I couldn't believe I had never thought to do it because it seems so obvious. And that my friends is why I love Pinterest.

She turned a 12-pack soda box into storage for canned food!
I'm sure I'm not the only one who thinks she's a genius. I made one myself and it's amazing how much space it saves.

I knew I was drinking all that Pepsi for something...

Monday, November 21, 2011

melt in your mouth pumpkin cookies

With Thanksgiving just a few days away (for those in the US), I thought I would give you one more thing to be thankful for! 
I am a big fan of pumpkin cookies and I've made several different recipes over the years. This one is BY FAR the best I've ever had. If you like pumpkin cookies, do yourself a favor and try this recipe TODAY! The cookies are so good, and there aren't really words to describe the frosting. I eat them for breakfast.
(Recipe from Better Homes & Gardens)

Cookies
· 2 cups butter, softened
· 2 cups granulated sugar
· 2 teaspoons baking powder
· 2 teaspoons baking soda
· 1 teaspoon salt
· 1 teaspoon ground cinnamon
· 1 teaspoon ground nutmeg
· 2 eggs
· 2 teaspoons vanilla
· 1 15-ounce can pumpkin
· 4 cups all-purpose flour
Frosting
· 1/2 cup butter
· 1/2 cup packed brown sugar
· 1/4 cup milk
· 1 teaspoon vanilla
· 2-3/4 cups powdered sugar
· Ground cinnamon (optional)

Preheat oven to 350 degrees F. In a large bowl, beat 2 cups butter with an electric mixer on medium to high speed for 30 seconds. Add granulated sugar, baking powder, baking soda, salt, cinnamon, and nutmeg. Beat until combined, scraping bowl occasionally. Add eggs and 2 teaspoons vanilla; beat until combined. Beat in pumpkin. Beat in as much of the flour as you can with the mixer. Using a wooden spoon, stir in any remaining flour. Drop dough by heaping teaspoons 2 inches apart on an ungreased cookie sheet. Bake for 10-12 minutes or until tops are set. Transfer cookies to a wire rack and let cool.

In a small saucepan, heat 1/2 cup butter and brown sugar until melted and smooth. Transfer to a medium bowl. Stir in milk and 1 teaspoon vanilla. Beat in powdered sugar until smooth. Spread frosting on cookies. If desired, sprinkle with additional cinnamon. Makes about 60 cookies.
**********
I double the frosting recipe because it doesn't make quite enough for me. I like to pile it on! Believe me, you will be so happy these little pieces of heaven have come into your life. You're welcome :)

Linked to
Positively Splendid
The Gunny Sack
Skip to my Lou
Flamingo Toes
Tatertots & Jello
Keeping it Simple
I {heart} Nap Time
The Girl Creative
Etcetorize
Under the Table and Dreaming
Craft-O-Maniac
Nap Time Creations
The Sasse Life
c.r.a.f.t.
Not JUST a Housewife
Mushki Loves

Thursday, November 17, 2011

framed snowflakes

This year instead of buying a bunch of Christmas decorations I have been trying to make as much as I can using things I already have. This craft is another one that cost very little and uses things I had... just in a different way.

I've had this frame for years but wasn't using it, and I bought the snowflake ornaments last year (I don't remember how much they were, but I'm guessing less than $1 each). The ribbon was $2.09 for 10 yards and the clear thread was $1.87 for 400 yards, and since I just used a little bit of each I still have lots left for other projects. 

I just replaced the silver ornament hangers with the clear thread and hot glued the thread to the back of the frame, then tied the ribbon around the frame. Fast and easy!
(Sorry about the dark and shadowy picture)

I love this ribbon. Ribbon, fabric, dishes, ornaments...anything really...if it's red with silver and/or white snowflakes I can't pass it up.

A close up of the pretty snowflakes. I love how they catch the light and shimmer.

Another cute decoration I'm excited to hang up next week (can you believe that? I can't wait!)

Linked to

Monday, November 14, 2011

some old clothes refashioned

If you like sewing and haven't discovered Tea Rose Home and Keeping It Simple yet, do yourself a favor and click on those little links there and spend some time exploring. These ladies are so creative and constantly inspire me to go "shopping" in my own closet to see if there is anything I can refashion. We all have those clothes we never wear but can't seem to get rid of, and on these blogs you will see so many ideas of things you can do to make them cute again! With budgets being tight, it's a great way to have something "new" without spending any money!

This turtleneck and skirt were 2 of those things for me. I've had them both for years and this was the first time the skirt had been taken out of the closet probably since I moved in over 4 years ago. The turtleneck wasn't much different. I wanted to turn them both into something I would want to wear again so they wouldn't just be taking up space in the closet.
(You will be relieved to know I never actually wore this outfit. Yikes. I just put it on for the before picture.)

I wanted to turn the turtleneck into a cardigan because they are pretty much my favorite thing right now. To do that all I did was mark the center of the front of the shirt with pins

and then cut it open!
It's made of ribbed fabric so I was able to make a straight cut just by following the lines of the ribbing. The best part is that the fabric doesn't fray at all so I didn't even have to hem anything. Instant cardigan!

I also cut the turtleneck part off and used the fabric to make a cute flower (4 circles folded in half and then in half again with a button in the middle)

For the skirt I pretty much just wanted to make it shorter. I'm just not a floor-length skirt kind of girl. I used another skirt that is the perfect length to measure where I wanted to cut

and then just hemmed the bottom.
It's a big improvement just like that, but I may still use the fabric I cut off the bottom to add something to the skirt. Maybe flowers along the diagonal seam? What do you think?
I used a tutorial on Sweet Verbena to add a cowl neck to that white shirt. I think it turned out cute, but hers is much better. I was just trying to use fabric I already had and I didn't have enough to make it very big.

A "new" outfit for $0!

Sometimes when I'm about to cut something I get a little bit nervous that it won't turn out how I imagine it and the original thing will be ruined, but then I just think I never wore it anyway so if it is ruined it doesn't matter and I might end up with something really cute! What do you have in your closet that could be refashioned?

Linked to

Thursday, November 10, 2011

button snowflake

Today I'm excited to share my first Christmas craft of the season with you!

A few years ago I got this picture in a gift exchange at a Christmas party
Not bad, but not really my style. I don't have any other old style Santas and (at the risk of being banished from blogland) I confess that I'm not really a big fan of the whole distressed look the frame has. And you can't see it in the picture, but there is also a spot in Santa's beard where it looks like something got stuck to the canvas and took a chunk of it off. I have hung this picture for Christmas the last few years because I had it, but this year I decided to change it to make it fit my style a little more.

First I painted the frame Magnolia White. It took 6 coats to cover the green but I think it was worth the effort.

Then I cut some sparkly red felt to fit the opening and glued it in
(Sorry about the dark pictures. By the time I finished painting the frame it was dark outside.)

And finished it off with a snowflake made out of white buttons 
I love the more modern and clean look of the white frame, and as you will see as I post more of my Christmas decorations, I am a huge sucker for red with white and/or silver snowflakes. For just $3.20 ($.75 for the white paint, $1 for 2 pieces of felt, and $1.45 for a package of white buttons) I turned a picture I didn't love into something I am excited to hang on my wall this Christmas!

Linked to

Entered in

Monday, November 7, 2011

ruffle shirt

I saw this tutorial for making a ruffle shirt and just fell in love with it. I don't have much experience with a sewing machine, but after making this ruffle bag I felt like I could handle a shirt. I can sew a straight line and that's really all this takes. I had two of the cap sleeve layering shirts from Shade in pink and one of them was pretty old and I didn't wear it anymore, so it was perfect for cutting up to make ruffles! This is how my shirt turned out:
I'm loving ruffle shirts under a cardigan right now, and I'm really happy with how this shirt turned out. Sachiko's tutorial is easy to follow and the whole thing only took a couple of hours to do. I also love using t-shirt fabric for ruffles because it doesn't fray so there's no hemming.

Here's Sachiko's shirt
She did 2 flowers and I only did 1, but other than that it's a pretty close match! If you want to a bunch of cute sewing ideas, definitely check out her blog!

Linked to

Thursday, November 3, 2011

pin cushion

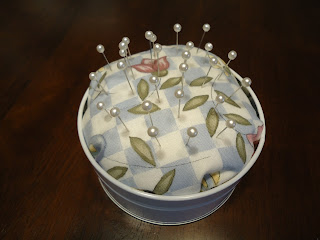
I've been doing a lot of sewing lately and have been wanting a cute pin cusion. I saw this one on Make it and Love it and decided to make my own version! And love it :)
All I had to buy was the tin which was $2 at Michaels. I already had the fabric and batting left over from a quilt I made a few years ago.
I just wrapped the fabric around the batting to make a pouch, put some hot glue on the bottom of the tin, and stuffed the pouch inside. Easy, fast, and look how cute!

And I may or may not have bought new pins to match the fabric :) If it's going to be sitting out next to my sewing machine it might as well match, right?

Linked to