Last week I showed you the before pictures of my 2 bathrooms (you can see that post here), and now that you have had a few days to recover from them I want to show you what I did to clean and update the master shower. I have to warn you that picture quality in this post is not going to be good. My bathrooms get no natural light and when you're taking a picture of white tile with white grout it's kind of hard to see. My apologies in advance.
The first thing I did was scrape out all the old caulk. It wasn't a fun job and was pretty gross, but I knew it would make a big difference and be totally worth it. Next, I took out the shower doors and removed the track. I wasn't sure if I was going to clean them and put them back up, or if I would leave them off completely. That question was answered when I saw this:
I had started scraping away the mold on the right side but you can see that there was a solid line of it under the door track. As soon as I saw that I knew there was no way they were going back on. It took lots of scrubbing and lots of bleach to get rid of it, but it's so nice to know my bathroom is now mold free.
There was mold on the wall behind where the door track had been too
The next thing I did was brighten up the grout using this stuff
It goes on with a toothbrush, and after a few minutes you go back and wipe off any that got on the tile. The application part goes very quickly and you can cover a pretty big section in just a few minutes. The wiping part takes quite a big longer though (I would call it scrubbing, not wiping), and I ended up spending about 12 hours on the grout in this shower. It wasn't fun and I was so relieved to be done, but the end result is amazing and definitely worth it.
I know it's hard to tell, but in this picture of the corner the wall on the left was done and the wall on the right was not. Can you see the difference in grout color?
On this tile the grout lines on the bottom and right side were done, and the lines on the top and left were not.
Once I was done with the grout, I applied new caulk on all the edges of the shower, and I was amazed at how clean and bright white everything looked. I'm so happy with how the grout looks, and I'm hoping it will last a long time.
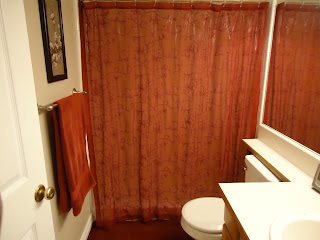
I'm sure at some point I will buy new doors for the shower, but for now I'm using a shower curtain and I'm completely fine with it. It looks much better than the doors and gives me a chance to add some color to the bathroom. This is how it looks right now. The towel and rug have always been there, and the curtain I've had for years but it was hanging in the guest bathroom before. I just moved the curtain rod and everything into this bathroom. I still love this curtain, and it goes with the colors in my master bedroom. My plan is to buy new towels and a new rug so everything isn't all the same color.
Next I'll be going back to the guest bathroom to show you how things are coming along in there...


3 comments:
Glad to hear that you were able to remove the mold in your bathroom. It is important to not let mold accumulate in your bathroom or anywhere in your house because it might contaminate the indoor air quality. Fix leaks to prevent the growth of mold.
-CM Hazard Control
You did a good job in cleaning your bathroom! It looks neat and fresh, as if its brand new or like you did a major update. Anyway, to remove the mold, a continuous cleaning and maintenance process is needed. It may sound tiring; but it's all worth the effort.
-Milani
Cleaning the bathroom is a task that no one likes to do, because it can be quite a chore, especially when unclogging drains and toilets. But you proved that cleaning the bathroom can be easy, with the right tools and procedure. Great job!
Lovella Cushman @ Perfection Plumbing
Post a Comment